On This Page
Startup
Keys
- NOTE: There are two key slots, but there should only be one key in the right slot. The left key slot would only be used to perform an emergency power off to the outlets in the AV booth.
- Turn on the key in the right-most of the two key slots located on the left-inside wall of the AV booth (if you are look to the left.
- Wait 1 minute before turning on the mixer.

Mixer
- Turn the mixer on by VERY BRIEFLY pressing the power button located at the top-right of the board.
- If you press and hold the Power button, you will power up the board in an “update” mode which will render it usable. To correct, press until the power button blinks, then briefly press again to shut it down. Then repeat the power up procedure

Lapel Mic
- Turn on the Sennheiser Wireless Mic Receiver for the Lapel Mic by pressing and holding the Power button located on the right front of each unit until the display lights up.
- Place the mic on a tie or lapel at mid-chest height.
- The mic has a “dimple” that you can feel through the foam pop-screen. This should be facing in.
- Never kink the cable or wrap tightly around the body pack.
- Do not bend the antenna tightly.

Primary Handheld Wireless Mic
- This receiver looks just like the one for the lapel mic, but has an Orange tag.
- Turn on the Sennheiser Wireless Mic Receiver for the Orange Handheld Mic by pressing and holding the Power button located on the right front of each unit until the display lights up.

Denon Digital Audio Recorder
(Audio Recording Currently Suspended)
- Press the Power button located on the left front of the unit.
- Pressing the “Rec/M.Track” button once will start it blinking, meaning it is in standby mode. Pressing it a second time will begin recording.
- To stop recording, press the “Stop/Cue” button.

Decide which Microphones to turn on
- Only turn on microphones that are needed at any given time. For a list of all microphones and audio input sources, see the “Mixer Channel Guide”
- Don’t forget to consider the auxiliary outputs (Monitors, Recorder, Narthex/Kitchen/etc) when tuning channels
- For details on the mic use/characteristics, see the “Microphones & Mixing” section below

Load a Cue (preset)
- Press the Cue List button located near the right-middle side of the board control surface. On the touchscreen display, you should then see a numbered list of cues. Use the scroll knob just right of the display to move up and down through the cues.
- Using the scroll knob to the right of the display, highlight the cue you want and press the knob to select it.
- Note: The volume faders for the channels will physically move when you do this.

Save a Cue
- NOTE: This step assumes you have already selected a Cue and have made changes to it that you wish to save.
- Be sure that the cue you wish to save is highlighted.
- Press the “Update” button on the touch screen.
- Confirm the update by touching the “Yes” button.

If two Wireless Handheld Mics are needed,
turn on the GTD Audio Wireless Mic Receiver
- Press the Power button located on the left front of the unit.
- NOTE: It is only advisable to have one of these two mics powered on at a time. They are frequency-hopping, but they share a frequency, and when one hops, it often causes the other one to have a loud pop.

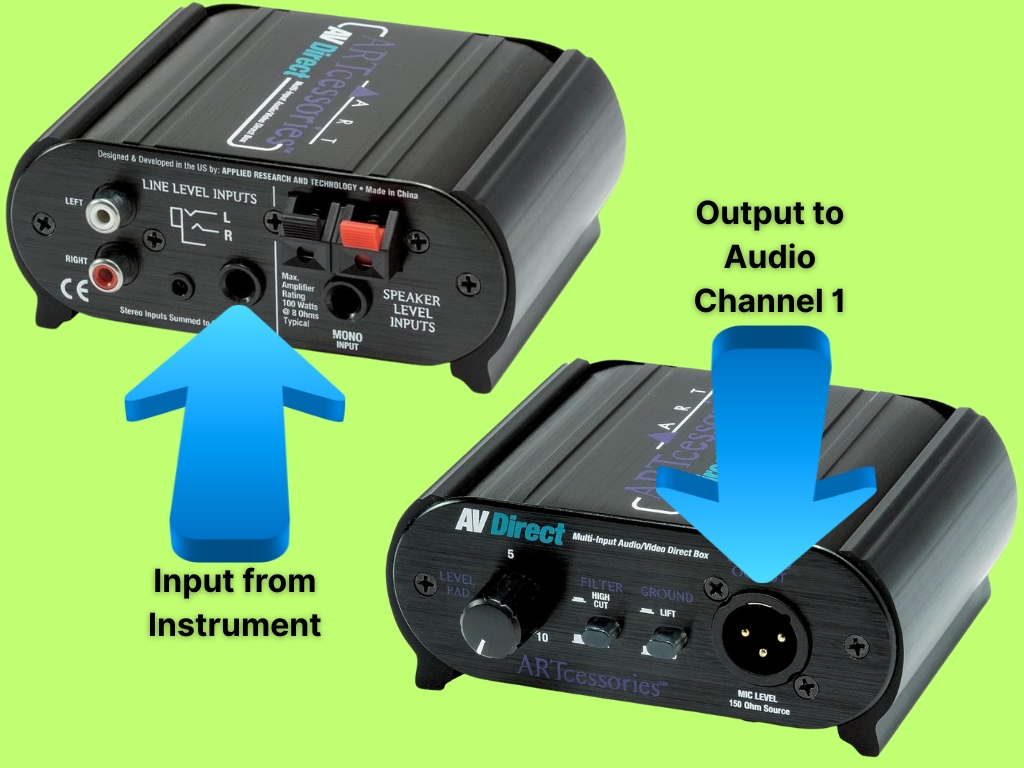
Plugging in an instrument
- We have one DI (Direct Input) box on the platform for plugging in instruments.
- Plug the instrument to the input indicated in the picture
- Connect the XLR to a cable that is plugged in to Channel One on the audio board.
- The Ground Lift button can be used to try and eliminate eliminate the hum from a powered instrument.
- The High Cut button can be used to try and reduce hiss and higher frequency sounds from the instrument.
If the Podium Needs to be moved
Shutdown
Turn off the amplifiers
- Turn off the right-most of the two keys located on the left-inside wall of the AV booth.
- There are two key slots, but there should only be one key in the right slot.
- The left key slot does not need to be turned off. It would only be used to perform an emergency power off to the AV booth.
Mixer and Other
Devices Used
- Press and hold the Power button (located at the top-right of the mixer board) until it blinks, then release, and press it again to finish the power off sequence.
- Turn off the Sennheiser wireless microphone receivers by pressing and holding the Power button located on the right front until the display says OFF.
- Turn off the Denon digital audio recorder by pressing the Power button located on the left front of the unit.
- Replace the dust cover over the surface of the mixer board.
Batteries / Charging
- Sennheiser and GTD Microphones – Current generation Sennheiser microphones are using replaceable batteries and should not be placed in the charger.
- Rode and Boya Lapel/Handheld Mics – Power off both the transmitter and receiver and place them in their charging stations. Charging stations have charge remaining indicators and do not need to be plugged in full-time.
Microphones & Mixing
Understanding Microphone Pickup Patterns
- Singers, never sing “at” a mic from the side – Mic’s are designed to reject sound from the sides of the handle and below.
- The area on this illustration outlined in pink is the area where audio is picked up. The areas outside are where the microphone is designed to reject sound.
- The one exception to this would be our studio mic which has a wide pickup pattern to allow a group to gather around the mic.
Holding Microphones
- Singers, always hold the mic right at your mouth, as close as possible without it touching your face.

Other Microphone Guidance
Proper use of a microphone (mic) can be the “make or break” factor for a pleasant listening experience.
- Select the correct mic for the task and group of performers – See the section below for characteristics of each of our mics.
- If something isn’t mic’d, it won’t be properly heard outside of the sanctuary – Musicians often think they do not need to be mic’d because their instrument needs no amplification in the Sanctuary (e.g. trumpet). Without amplification, other areas of the church and the live stream would not be able to hear.
- DO NOT turn microphones on and off – Live status is controlled from the AV booth.
- Having a sound-check is important – Besides allowing us to balance the sound, we need the performers to be able to hear their soundtrack in the monitor if they are using one. Sound-checks need to be conducted between 9:30 – 10:15 am.

General Guidelines
- When evaluating mic needs be aware that anyone outside the Sanctuary will not hear a voice or instrument that is not mic’d.
- Advise users of wireless mics to leave all electronics behind (e.g. phones, smart watches).
- Phantom Power
- Mics needing phantom power are noted with red in the mic name.
- Don’t move mics to different ports if at all possible:
- It is rare that you will be the only one to need the board and moving mics can disrupt other operations.
- Moving them also may also require changes to phantom power.
- Loading a Cue
- Saving a Cue
- Gain
- Most mics are designed to reject sound from the sides and below the mic head.
- Because of this, it is important to speak in to the front of a mic, not from the side.
- Headphones
- The headphones with the orange tag is connected to the audio board.
- The other set lets you listen to the live stream when active.
- Be aware that the live stream is approximately four seconds behind real-time.
- Solo to hear a channel in the main headphones.
Specific Information about each microphone
Podium Mic
- Not a very wide pickup pattern.
- Not great for picking up multiple singers so use extra mics when songs are being led by a group.
- When the podium needs to be moved to the side near the organ and the mic is still needed, plug it into jack $9 behind the organ.
- NOTE: Speakers should not “lean in” to this mic as they would with a handheld. It is not designed for close proximity to a mouth. If the speaker is too close, there will be very detrimental breath “pops”.

Sennheiser Lapel Mic
- Place the mic on a tie or lapel at mid-chest height.
- The mic has a “dimple” that you can feel through the foam pop-screen. This should be facing in.
- Never kink the cable or wrap tightly around the body pack.
- Do not bend the antenna tightly.
- Suitable for speaking.
Orange Sennheiser handheld wireless Mic
- Power is located at the bottom, under side of the mic.
- Coach people to NOT touch the mute button on the side. A red mute light means it is on!
- Suitable for all purposes.
- Ideal for singing vocals.
- Note that poor line of sight between mic and receiver will cause pops and dropouts.
GTD Audio Wireless Mic
- Press the Power button located on the left front of the unit.
- NOTE: It is only advisable to the blue mic powered on at a time. They are frequency-hopping, but they share a frequency, and when one hops, it often causes the other one to have a loud pop.
- Note that poor line of sight between mic and receiver will cause pops and dropouts
Red Prayer Mic & Green Vocal Mics
- Suitable for all purposes.
- Ideal for singing vocals.
- WARNING: You cannot use the piano mic for other purposes during a program where the piano will be used at any point.
Shotgun organ mic
- WARNING: You cannot use this mic for other purposes during a program where the organ will be used at any point.
- There is a conical pickup pattern radiating outward from the front of the mic
- It is designed to reject sound from the sides and rear.
- To use it to pick up a large group, it needs to be placed reasonably far away based on the size of the group.
- Use the “Solo” button on the channel to preview that you are picking up the entire group.

Studio Mic (aka “Fishbowl”)
- Ideal for singers
- Wide pickup pattern good for small groups
- Broken mount currently impairing the ability to adjust the angle

Boya Wireless Mic Set
- Power the receiver using a USB-C cable
- Plug the ⅛” audio adapter from channel 28 into the receiver.
- Power up one or both transmitters.
- They can be used by simply clipping them on to a lapel, or by adding on the included lapel microphones.
- Each transmitter has indicators for signal, battery level and controls for mute and gain level.
- NOTE: Both wireless mics in this set use a single receiver, so controlling the volume level on the board affects both.

Rode Wireless Go Mic Set
- Unplug the Receiver and Transmitter and power them up (power buttons on top/bottom).
- Plug the receiver (the one with a display) into the ⅛” jack that should be laying on top of the mixer or front shelf of the booth.
- Install the transmitter in the handle (power button down) and place the Rode labeled pop filter on it.

Other Operating Tips
Training
- Before operating the system, please understand and ask for training on how to tune all of the output channels.
- If you do not, you will probably be able to provide a good audio mix for those in the room but those outside the Sanctuary will not have a good audio experience.
- Output channels include:
- The Sanctuary mix
- Output Bus 1 – Stage Audio Monitor Channel A
- Output Bus 2 – Stage Audio Monitor Channel B
- Output Bus 3 – Narthex/Mother’s Room/Kitchen/Gym mix
- Output Bus 4 – Denon Digital Audio Recorder
- Output Bus 5 – Live Stream
Training
- ALWAYS have one audio source enabled so that listeners outside of the sanctuary do not think there is a problem with their audio.
- NEVER have more microphones on than are needed.
- Do not use microphone Gain controls as volume controls.
- Gain should be set as high as possible without introducing feedback or echo.
- Feedback ringing/squealing can be caused by having the gain OR volume fader set so high the the output is being captured at a high level by a microphone.
- Echo is caused by setting the gain high enough that the microphone picks up an echo of itself.
- You should use the faders (sliders) to compensate for different voices, not the gain control.
- Echo and feedback rules do not apply to channels that are not microphones.
- For performance soundtracks, set your gain during sound check with the performer to be sure there is adequate signal to send to the monitors so they can hear their track while standing on the platform. Then tune all other outputs to regulate the level of the track that they are receiving.
- Remember that altering the gain affects every output bus and changing it will cause you to need to re-tune all of the outputs.